If you’re looking to improve your virtual facilitations, no matter what platform or service you’re using, OBS can be a new best friend.
OBS, Open Broadcaster Software, is a powerful tool for anyone who wants to improve the experience of their virtual facilitations for their participants. OBS can allow you to transform and manipulate your video feed so that you can screen share, share videos, add your logo, do split screen with yourself and instructions, and so much more, anywhere you’re using a webcam.
If after checking out OBS you want to spend some time exploring OBS with other facilitators join our OBS Brain Jam Encore, a totally free drop-in session on Tuesday April 20th at 10am PT (3pm ET | 6pm GMT) RSVP here.
Why Use OBS?
Rather than tell you all the cool things we can do with OBS as facilitators, let me show you. Here is a short demo I did where I previewed the power of OBS in a Zoom meeting with a few other facilitators.
I think the power of OBS and how we might use it to enhance our virtual facilitations is endless, but when I first went to download OBS I found the interface intimidating. I almost didn’t get past the initial download.
The focus of the rest of this post is to get you ready to play around with and explore in OBS and guide you through the initial process of getting it installed, started, and ready to go.
Getting Started with OBS
The first thing you need to do is to download OBS and install it on your computer. There are different versions of OBS for Mac or PC so be sure you download the right one for you.
For some people, as soon as they land on the OBS website they think, “Whoa this looks really techy, I don’t know if I can do this.” I felt really intimidated by OBS the first time I discovered it and a few months later I can’t imagine facilitating without it, so don’t fear, you can get there too!
Once you have it downloaded and installed and you open it up for the first time, you’re going to hit something called the “auto-configuration wizard.” Some people see this and panic because they don’t know the answers to the initial questions. Not to worry. Simply select the second option down (Optimize just for recording) and then click “next” until it’s done and then hit “apply settings.”
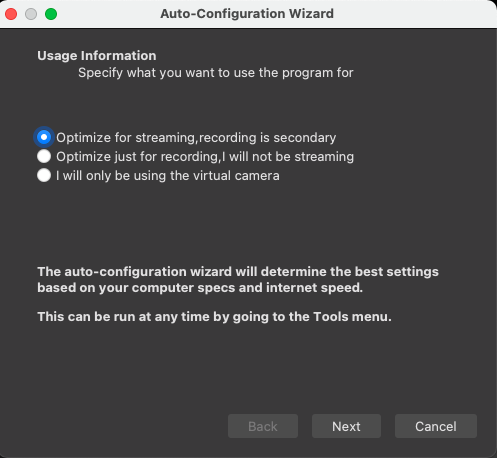
Know that if you want to dig more into these settings, you can always change them later.
Once the wizard is done auto-configuring, you’re likely now seeing something that looks like this.
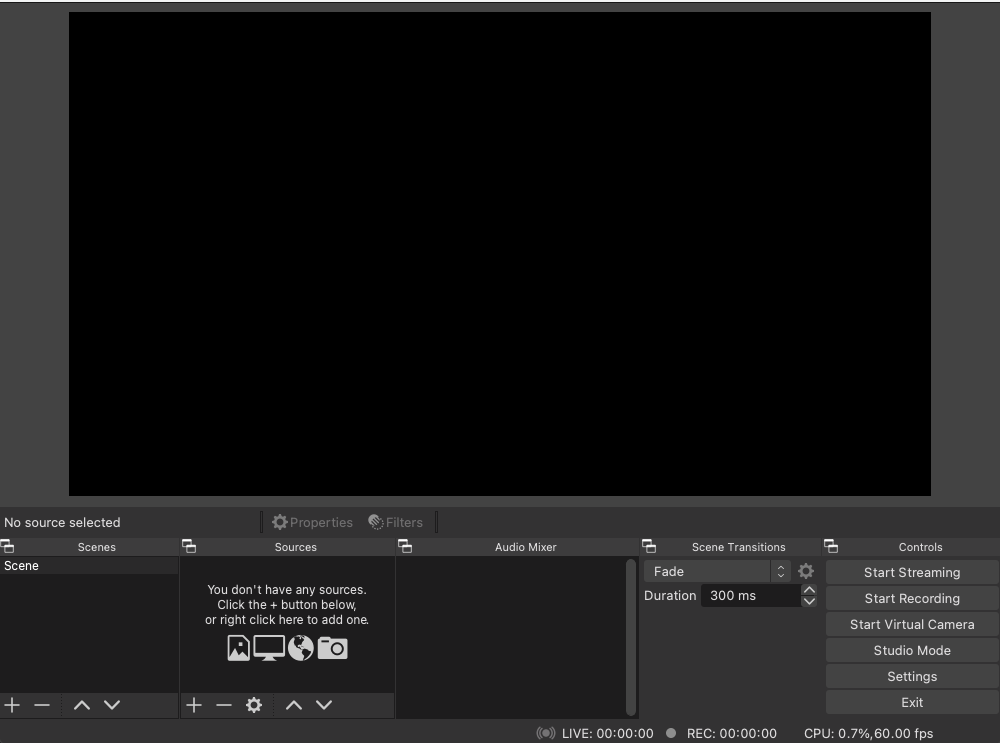
Which means you’re (almost) ready to build!
If you’re on a Mac there are a few more steps for you to do before you jump into building, namely giving OBS permission to access your screen, microphone, and camera. Here is a short video of how to set up all those permissions on your Mac.
Be sure to follow the directions to add your camera in OBS (and have it not work) before you head over to System Preferences to enable the permissions.
Building Your First Scenes in OBS for Facilitation
In our April Brain Jam on OBS we spent time learning how screen sharing and using OBS to facilitate felt different than screen sharing in Zoom. We also built our first scenes in OBS. Watch the recording of the April Brain Jam on OBS for virtual facilitation here.
If you’re wanting to jump right into building in OBS, you can do that too. Below is a step-by-step walkthrough for setting up your first scenes in OBS. At the end of the 10 minutes you’ll have the ability to use OBS to share your screen (no more screen shares!) and much more. We’ll go over how to add your camera, window captures (for screen shares), images, text, and how to easily crop and resize any element you add to your OBS.
Here are a few common issues that people have when they start to build.
- Video capture device (your camera) shows up empty (black screen). This means your computer hasn’t given permission to OBS to access your webcam. Watch the tutorial of how to solve this for Mac, or if you’re on a PC, make sure your webcam isn’t currently being used by a different software.
- Window capture list doesn’t show the window you want to share. First thing to check is whether the window you want to share is open (not minimized) but not on full screen. It cannot be on full screen or minimized for this to work. If making the window the right size still doesn’t do the trick, that means OBS doesn’t have the correct permissions to access your screen. Mac users should follow along with the tutorial for this as well.
- OBS Virtual Camera doesn’t appear in Zoom or Google Meet as an option. Close both programs and open them again. Don’t worry, everything you’ve built in OBS will automatically be saved.
Using OBS as Your Webcam
Once you have your scenes built in OBS the next step is to try out using OBS as your webcam. Before opening up Zoom or whatever software you use to facilitate, first in OBS you need to select the option “Start Virtual Camera.” This is found in the “controls” column on the bottom right. Once you’ve selected that, open up whatever software you use to facilitate and change your camera to OBS Virtual Camera.
Know that your OBS camera will appear backwards (to you) but will be the right way around to your participants. If you want to change this in Zoom, toggle off “Mirror my video”.
And if that worked, you did it! You’re ready to start building new scenes and facilitating with OBS.
Got Stuck? LMK
If you get stuck in setting up OBS, let me know; I’m happy to troubleshoot with you and to keep adding to the guide until we have all questions answered.
This is just a basic reference for those looking to get started with OBS. If you have more advanced questions, YouTube is a wealth of knowledge when it comes to OBS. I found that the hardest part of OBS was getting it set up, but that once I had built my first few scenes and had it installed properly, I was able to run with it from there.
OBS is a game changer for facilitators and is a tool that I’m really excited to continue to explore and use in my facilitations in the future.
If you start using OBS for virtual facilitation, I’d love to know how you’re using it! Send a screenshot or even a video you recorded right in OBS to hello@facilitator.cards so we can celebrate with you, or @ us on social media. Or drop by the OBS Brain Jam Encore, a totally free drop-in session on Tuesday April 20th at 10am PT (3pm ET | 6pm GMT).
I can’t wait to see what you do.
Happy Facilitating!
Also big shout out to Vivian Vaillant who helped contribute to this guide and who supported the Brain Jam with awesome troubleshooting and technical support!
Facilitator Cards is not sponsored by or associated with OBS in any way. We simply think this is a really neat piece of software that we’re excited to use and explore as facilitators.
Facebook Discussion 💬 Join our Group 🤓